之前的热更新系列文章中介绍了 UE 热更新的流程和打包细节,其实有一些热更补丁优化的工程实践我觉得也可以详细介绍。
本篇文章从生成 Shader 的 Patch 入手,目的减少每次热更新时的 Shader 的大小,并会对引擎内部的实现细节做一些分析,解决引擎中的 Shader Patch 的相关问题,并基于 HotPatcher 的实现自动化的 Shade Patch 流程。
shaderbytecode 的生成与加载
UE 在Project Settings-Packaging 中提供了 Share Material Shader Code 的选项,可以控制 Shader 的共享,存储为单独的文件中,减少包体的大小。
By default shader code gets saved inline inside material assets, enabling this option will store only shader code once as individual files This will reduce overall package size but might increase loading time.

当开启这个选项之后打包项目,包内的 Content 目录下会生成以下两个 ushaderbytecode 文件:
打包的 Pak 中的 Mount Point 为:
1 | ../../../PROJECT_NAME/Content/ |
而且 ushaderbytecode 文件的命名根据以下规则:
1 | static FString ShaderExtension = TEXT(".ushaderbytecode"); |
ushaderbytecode 在引擎启动时会自动加载,但是注意 Global 和项目两者加载时机的区别:
1 | int32 FEngineLoop::PreInitPreStartupScreen(const TCHAR* CmdLine) |
综上所述,引擎打包对于 Shader 的处理需要注意以下两点:
- 打包项目是会只把当前打包的资源的 Shader 编译到 ushaderbytecode 中
- 引擎启动时会自动加载
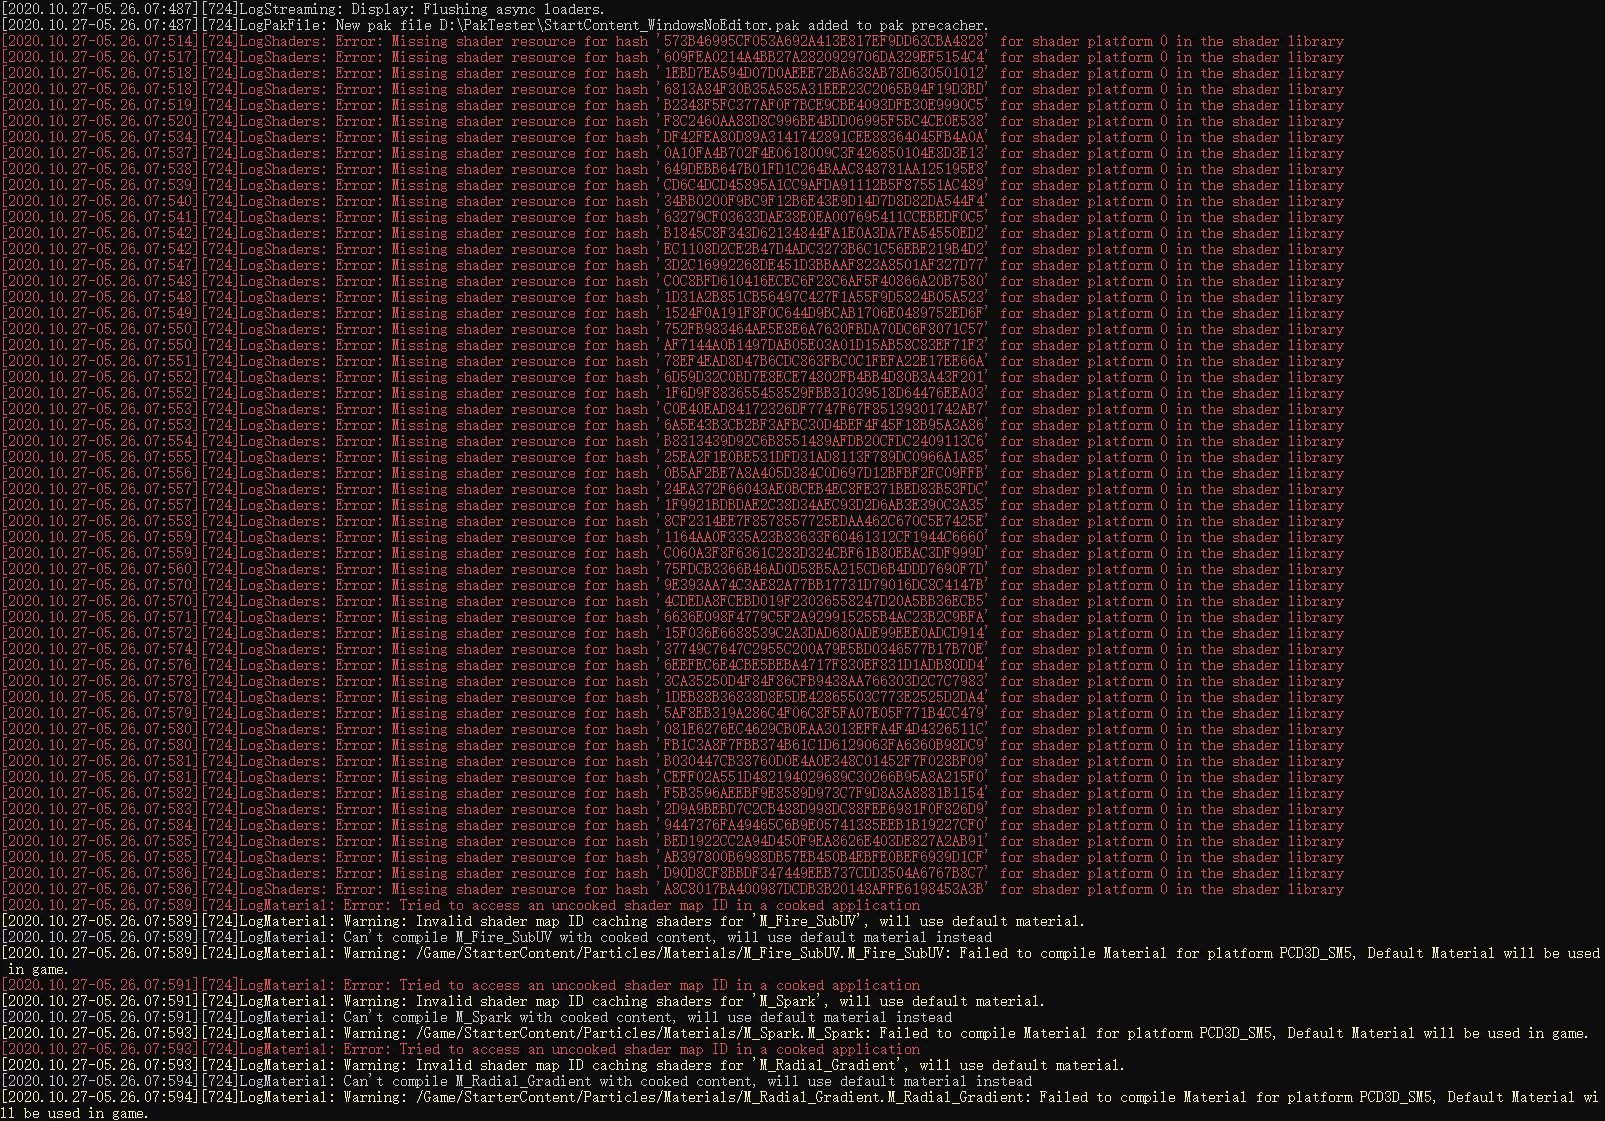
所以,如果我们进行热更新资源时有 shader 的变动或者新增了,如果不把 shaderbytecode 打包进来,会导致有些资源没有效果,如图:

Log 中的错误:
这就需要我们去处理更新 Shader 的情况。
Shader 的热更新
根据前面一小节的介绍,我们知道了打包时会自动把 所打包资源 的 Shader 生成到 ushaderbytecode 文件中,当我们热更时新增了材质,需要把新的 shader 文件给打到 pak 中,在运行时加载,不然会丢失材质效果。
在 HotPatcher 中提供了包含 shaderbytecode 的选项,会把 Cook 之后最新生成的 ushaderbytecode 打包到 pak 中:

并且 Monut Point 与基础包的相同。
当我们挂载热更的 pak 时,需要 pak order 大于基础包中的 pak,这样我们热更的 pak 中的 ushaderbytecode 就是优先级最高的,但是因为前面也已经提到了,引擎启动时就已经自动加载了基础包中的 shaderbytecode,当程序运行起来之后挂载的 pak 中的 shaderbytecode 就不会被自动加载,这需要在挂载 pak 之后自己执行:
1 | void UFlibPatchParserHelper::ReloadShaderbytecode() |
调用 FShaderCodeLibrary::OpenLibrary 函数即可。
综上所述,我们热更 shader 时的流程如下:
- 执行 Cook 生成包含最新资源的 ushaderbytecode 文件
- 打包 ushaderbytecode 到 pak 中
- 手动加载 ushaderbytecode
重新生成 ushaderbytecode 可以直接使用以下 cook 命令:
1 | UE4Editor-cmd.exe PROJECT_NAME.uproject -run=cook -targetplatform=WindowsNoEditor -Iterate -UnVersioned -Compressed |
其实它会 rebuild metadata,AssetRegistry 之类的都会重新生成。
执行完毕之后 Saved/Cooked 下的 AssetRegistry.bin以及 Metadate 目录 /Content/ShaderArchive-*.ushaderbytecode以及 Ending/GlobalShaderCache*.bin等文件都是生成之后最新的了,可以在之后通过 HotPatcher 来打包他们了。
Shader Patch 的生成
但是,上一节的介绍其实是每次热更都需要完整地把 shaderbytecode 更新,其实是有点浪费的,因为基础包中的 shader 已经存在了,没必要我们每次更新还要把已有的包含进来,而且到项目后期 Shader 的占用会很大,甚至有的能达到几百 M,如果每次资源变动的热更都要包含几百 M 这肯定是不行的,所以也需要对 Shader 进行 Patch,实现增量更新的目的。
UE 中在 4.23+ 中开始提供了创建 ShaderPatch 的方法,需要提供 Old Metadata 和 New Metadata 的目录,Metadata必须要具有以下目录结构:
1 | D:\Unreal Projects\Blank425\Saved\Cooked\WindowsNoEditor\Blank425\Metadata>tree /a /f |
需要在打基础包时备份好当时的 Metadata 目录,把最新的工程在执行 Cook 之后的 Metadata 目录作为 New Metadata,基础包的作为 Old Metadata,调用引擎中的 FShaderCodeLibrary::CreatePatchLibrary 函数,但是这个函数在不同的引擎版本中原型有差异,可以实现一层封装:
1 | bool UFlibShaderPatchHelper::CreateShaderCodePatch(TArray<FString> const& OldMetaDataDirs, FString const& NewMetaDataDir, FString const& OutDir, bool bNativeFormat) |
FShaderCodeLibrary::CreatePatchLibrary内部的实现原理是,从 Old Metadata 序列化出旧的 Shader 数据,与 New Metadata 的做比对,有差异的部分作为 Patch 中的 Shader。
HotPatcher 中提供了 Shader Patch 的配置和管理方法:

可以同时指定多个平台以及 Metadata 的目录参数,并且支持 commandlet。
4.25+ ShaderPatch Crash
注意 ,引擎中提供的FShaderCodeLibrary::CreatePatchLibrary 在 4.25 中有 bug,会导致生成 Patch 时的 Crash,下面写一下解决方案。
在 4.25 引擎版本中调用 FShaderCodeLibrary::CreatePatchLibrary 来创建 ShaderCode Patch 会触发 check 抛异常: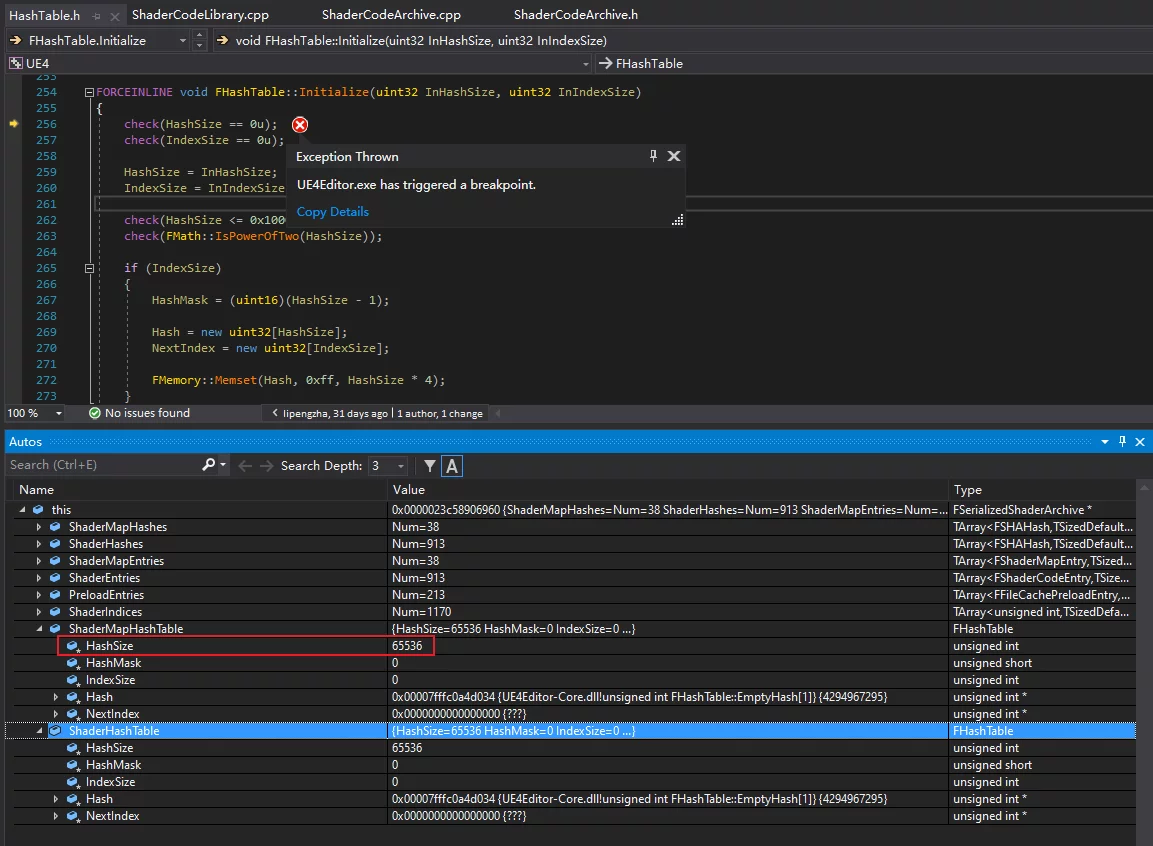
这是因为 FEditorShaderCodeArchive 的构造函数中调用了 ShaderHashTable 的 Initialize,并给了默认值0x1000:
1 | FEditorShaderCodeArchive(FName InFormat) |

导致在后续的流程中 (FSerializedShaderArchive::Serialize) 调用 Initialize 的时候 check 失败了(因为 HaseSize 已经有值了,并不是 0,对其再调用 Initialize 就触发了 check):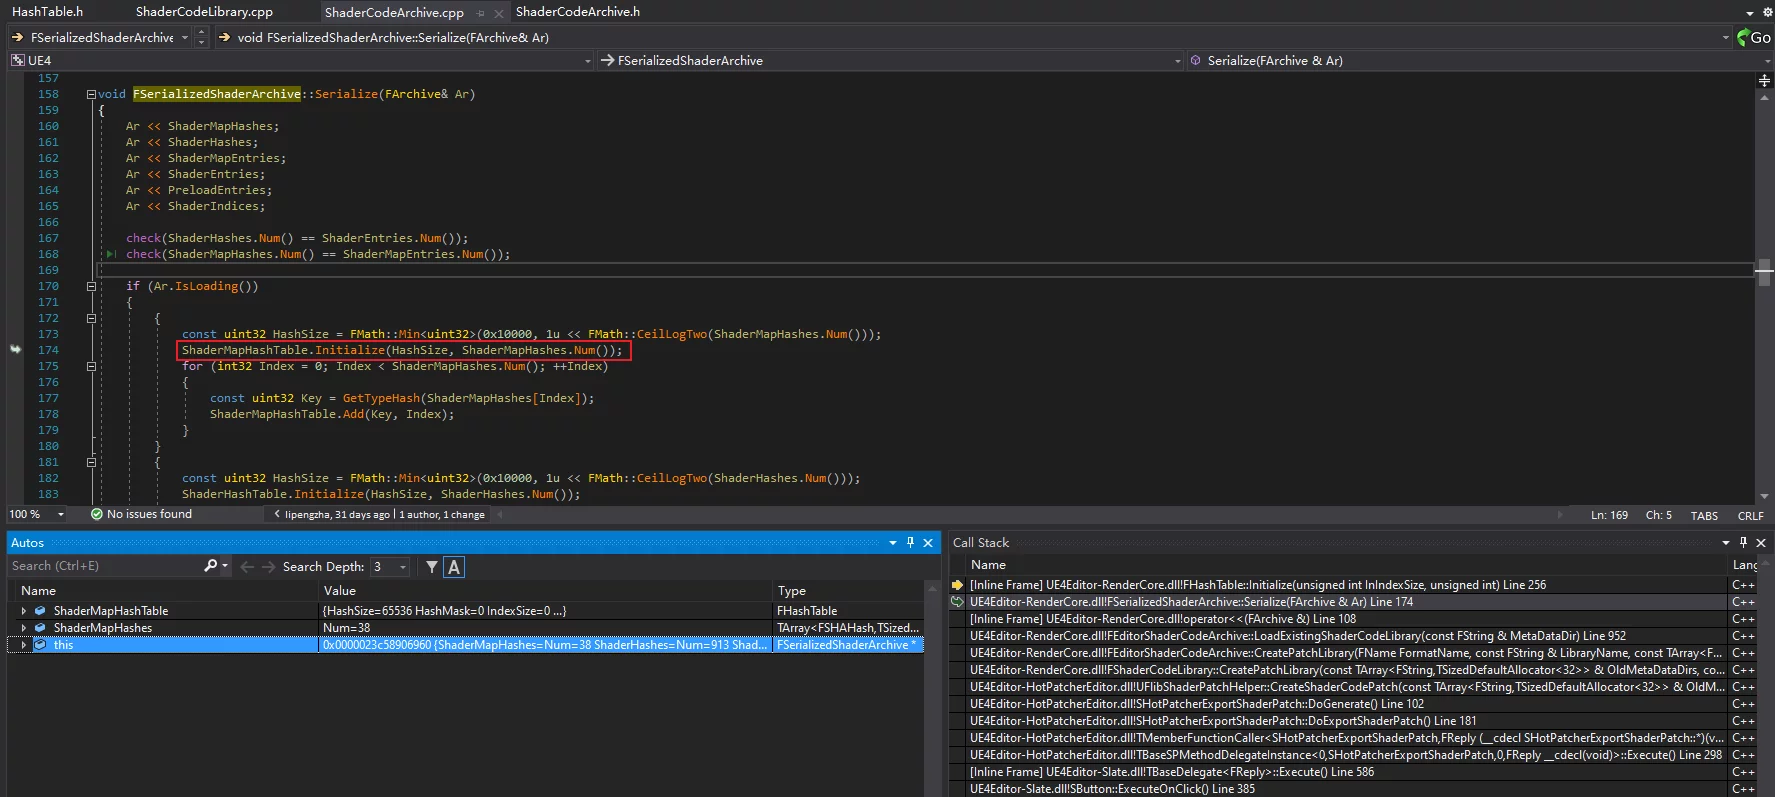
查了下 FEditorShaderCodeArchive 构造函数中调用 Initialize 的代码是在 4.25 之后的引擎版本才有的,所以影响到的之后 4.25+ 的版本。
代码对比:
- 4.24.3-release/Engine/Source/Runtime/RenderCore/Private/ShaderCodeLibrary.cpp#L922
- 4.25.0-release/Engine/Source/Runtime/RenderCore/Private/ShaderCodeLibrary.cpp#L801
解决方案:把 FSerializedShaderArchive::Serialize 中ShaderMapHashTable的 Initialize 和ShaderHashTable的 Initialize 在 Editor 下注释掉,因为 FEditorShaderCodeArchive 的代码只在 Editor 下有效,并且是只在生成 ShaderPatch 时有用。
这就造成了以下几个问题:
FEditorShaderCodeArchive的构造只有 Eidotor 并且 ShaderPatch 是才有用,也就意味着这里写的ShaderMapHashTable的Initialize和ShaderHashTable的Initialize只有在创建 ShaderPatch 时才会执行- 在打基础包时执行 Cook 会编译 shader,但是不会执行 FEditorShaderCodeArchive 的构造,
ShaderMapHashTable的Initialize和ShaderHashTable的Initialize也就不会执行,就需要在使用的地方来调用它们的初始化
这也是 UE 中没有管理好这两个状态的地方:在 FEditorShaderCodeArchive 和FSerializedShaderArchive::Serialize中都做了 Initialize 的操作,在打基础包时造成了 ShaderMapHashTable 和ShaderHashTable的 Initialize 已经被 FEditorShaderCodeArchive 初始化的情况下又被 FSerializedShaderArchive::Serialize 执行了一遍,导致 Crash,但是我们又不能粗暴地把任何一处的初始化操作去掉,只能通过检测 ShaderMapHashTable 和ShaderHashTable的 Initialize 是否已经被执行,来选择性的跳过。
阅读代码可以知道 ShaderMapHashTable 和ShaderHashTable的 Initialize 只应该执行一次,并且初始化之后 HashSize 和 IndexSize 应该具有非 0 值:
1 | FORCEINLINE void FHashTable::Initialize(uint32 InHashSize, uint32 InIndexSize) |
在 Initialize 时会检测当前的 HashSize 和IndexSize是否为 0,并在之后进行赋值。所以,我们只要获取 FHashTable 的HashSize和 IndexSize 检测它们是否为 0 即可判断当前的 HashTable 对象是否已经被 Initialize 过,但是,UE 里的 FHashTable 里这两个成员都是 protected 的,只能修改引擎来实现了:
添加获取 FHashTable 的HashSize和 IndexSize 属性的成员函数:
1 | class FHashTable |
然后在 FSerializedShaderArchive::Serialize 进行检测,如果已被初始化则跳过 Initialize 逻辑:
1 | void FSerializedShaderArchive::Serialize(FArchive& Ar) |
这样可以统一 ShaderPatch 和 Runtime 的 HashTable 的 Initialize 流程。
Shader Patch 的自动化流程
HotPatcher 中支持了 Shade Patch 的配置化 Commandlet 功能,可以通过配置文件执行:
1 | UE4Editor.exe PROJECT.uproject -run=HotShaderPatch -config="export-shaderpatch-config.json" |
-config 参数所接收的文件都可以从编辑器中通过插件导出。
并且也支持在命令行上的参数替换,与 HotRelease 和 HotPatcher 的 Commandlet 功能类似,这里不再赘述,可以直接去看 HotPatcher 的文档介绍:
只需要管理好项目每次版本的 Metadata 目录,就可以编辑一份通用的配置文件导出,在每次 HotPatcher 的 Patch 任务前执行生成 Shader 的 Patch 文件,以外部文件的形式添加至 HotPatcher 的配置中即可。剩下的事情就是运行时加载 Shader Patch 的文件了,插件中同样做了函数库的支持:
1 | bool UFlibPatchParserHelper::LoadShaderbytecode(const FString& LibraryName, const FString& LibraryDir); |
注意事项
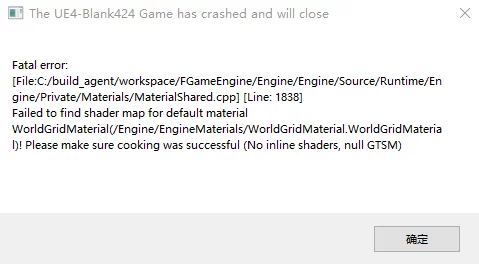
在 Shader Patch 的使用中需要注意的是:生成出来的 ShaderPatch 的 ushaderbytecode 文件是与基础包内的文件名一致的,所以不能使用引擎启动时的默认挂载(会导致基础包内的 ushaderbytecode 文件无法被加载,从而 crash)。
应该按照前文的介绍在挂载之后自己处理 ShaderPatch 的 ushaderbytecode 文件的加载。
并且 :ShaderPatch 的更新不 直接支持Patch 的迭代,如:1.0 Metadata + 1.1 的 ShaderPatch,并不能生成 1.2 的 ShaderPatch,必须要基于 1.1 的完整 Metadata 才可以,即每次 Patch 必须要基于上一次完整的 Metadate 数据(Project 和 Global 的 ushaderbytecode 文件),在工程管理上每次打包都需要把完整的 Metadata 收集起来。